PC Solid Sheet Installation Guide
Professional installation instructions for polycarbonate solid sheets. Follow these best practices for optimal performance and long service life.
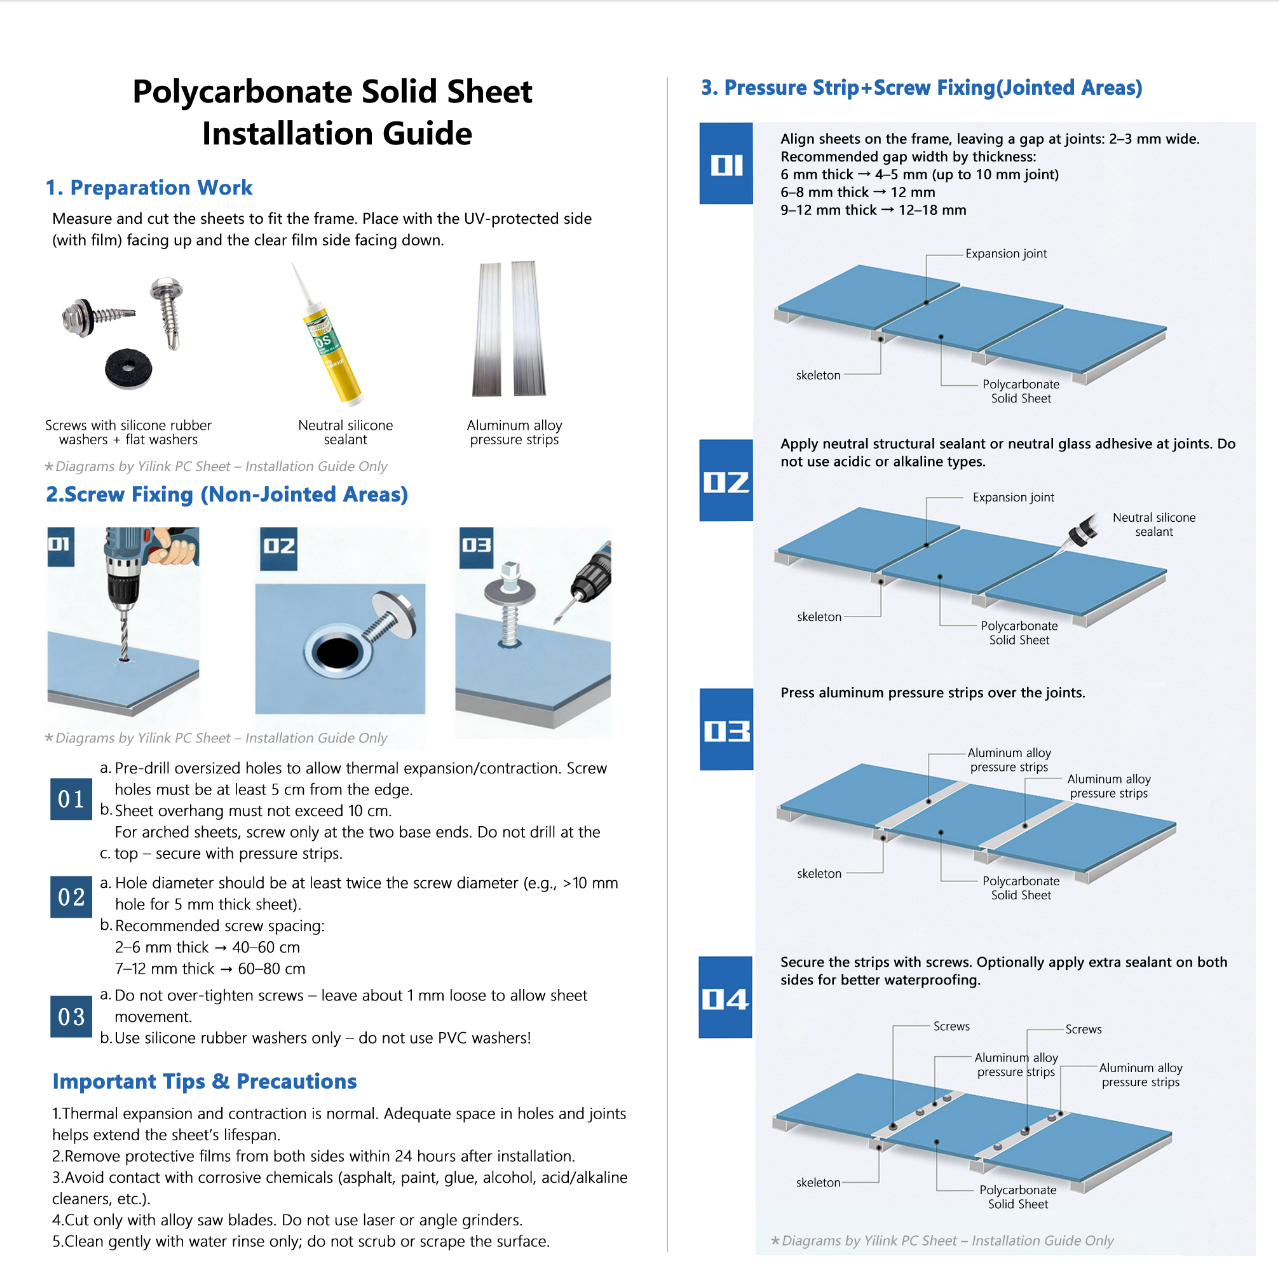
1. Preparation
Measure and cut sheets to fit the frame. Install with the UV-protected side (marked with protective film) facing upward and the clear side facing downward.
Required Tools
- • Screws with silicone rubber washers
- • Flat washers
- • Drill with appropriate bits
Sealant
- • Neutral cure silicone sealant
- • Do NOT use acidic or alkaline sealants
Fixing Materials
- • Aluminum alloy pressure strips
- • Appropriate for joint areas
2. Screw Fixing (Non-Jointed Areas)
01Pre-Drilling Requirements
- Pre-drill oversized holes to accommodate thermal expansion and contraction
- Screw holes must be at least 5 cm from sheet edges
- Sheet overhang must not exceed 10 cm
- For arched installations, fasten only at the two base ends. Do not drill at the crown – use pressure strips instead
02Hole Diameter & Screw Spacing
- Hole diameter should be at least twice the screw diameter (e.g., >10 mm hole for 5 mm thick sheet)
- Recommended screw spacing:
- 2-6 mm thickness → 40-60 cm spacing
- 7-12 mm thickness → 60-80 cm spacing
03Installation Best Practices
- Do NOT over-tighten screws – leave approximately 1 mm clearance to allow for sheet movement
- Use silicone rubber washers only – do NOT use PVC washers!
3. Pressure Strip + Screw Fixing (Jointed Areas)
01Gap Requirements at Joints
Align sheets on the frame with expansion gaps at joints: 2-3 mm minimum
Recommended joint gap by sheet thickness:
- 6 mm thickness → 4-5 mm gap (up to 10 mm for long joints)
- 6-8 mm thickness → 12 mm gap
- 9-12 mm thickness → 12-18 mm gap
02Apply Sealant
Apply neutral cure structural sealant or neutral silicone at joints. Never use acidic or alkaline sealants.
03Install Pressure Strips
Install aluminum pressure strips over the joints. Ensure uniform pressure distribution across the entire joint area.
04Secure with Screws
Fasten strips with screws. Apply additional sealant on both sides for enhanced waterproofing (optional).
Important Installation Tips
- Thermal expansion is normal. Proper clearance in holes and joints extends service life.
- Remove protective films from both sides within 24 hours after installation.
- Avoid contact with corrosive substances (asphalt, paint, adhesives, solvents, acid/alkaline cleaners, etc.).
- Cut with alloy saw blades only. Do not use laser cutters or angle grinders.
- Clean with water rinse only; do not scrub or scrape the surface.
Need Installation Support?
Our technical team provides professional installation guidance and support for all PC sheet projects.
Get Technical Support